Hello and welcome to another Millennia Design Diary!
I’m Rob “Xemu” Fermier, lead programmer and co-designer (along with Ian Fischer – fun fact, we’ve been working together since “Age of Mythology” way back in 1999!). We’ve talked about the Map, the Nations, and the Combat in the game, but today I’m excited to talk in more detail about the Economy of the game.
Ever since the early concepting of the game, having deep and rich economic systems has been one of our primary goals. Whether your path to victory involves raising massive armies, rushing ahead in the tech tree, or securing your cultural prominence, doing any of those things requires a strong economy to be successful. There’s a lot to cover here – in fact so much that we’ll be doing a second entire Design Diary on the economy later on!
Econ 101
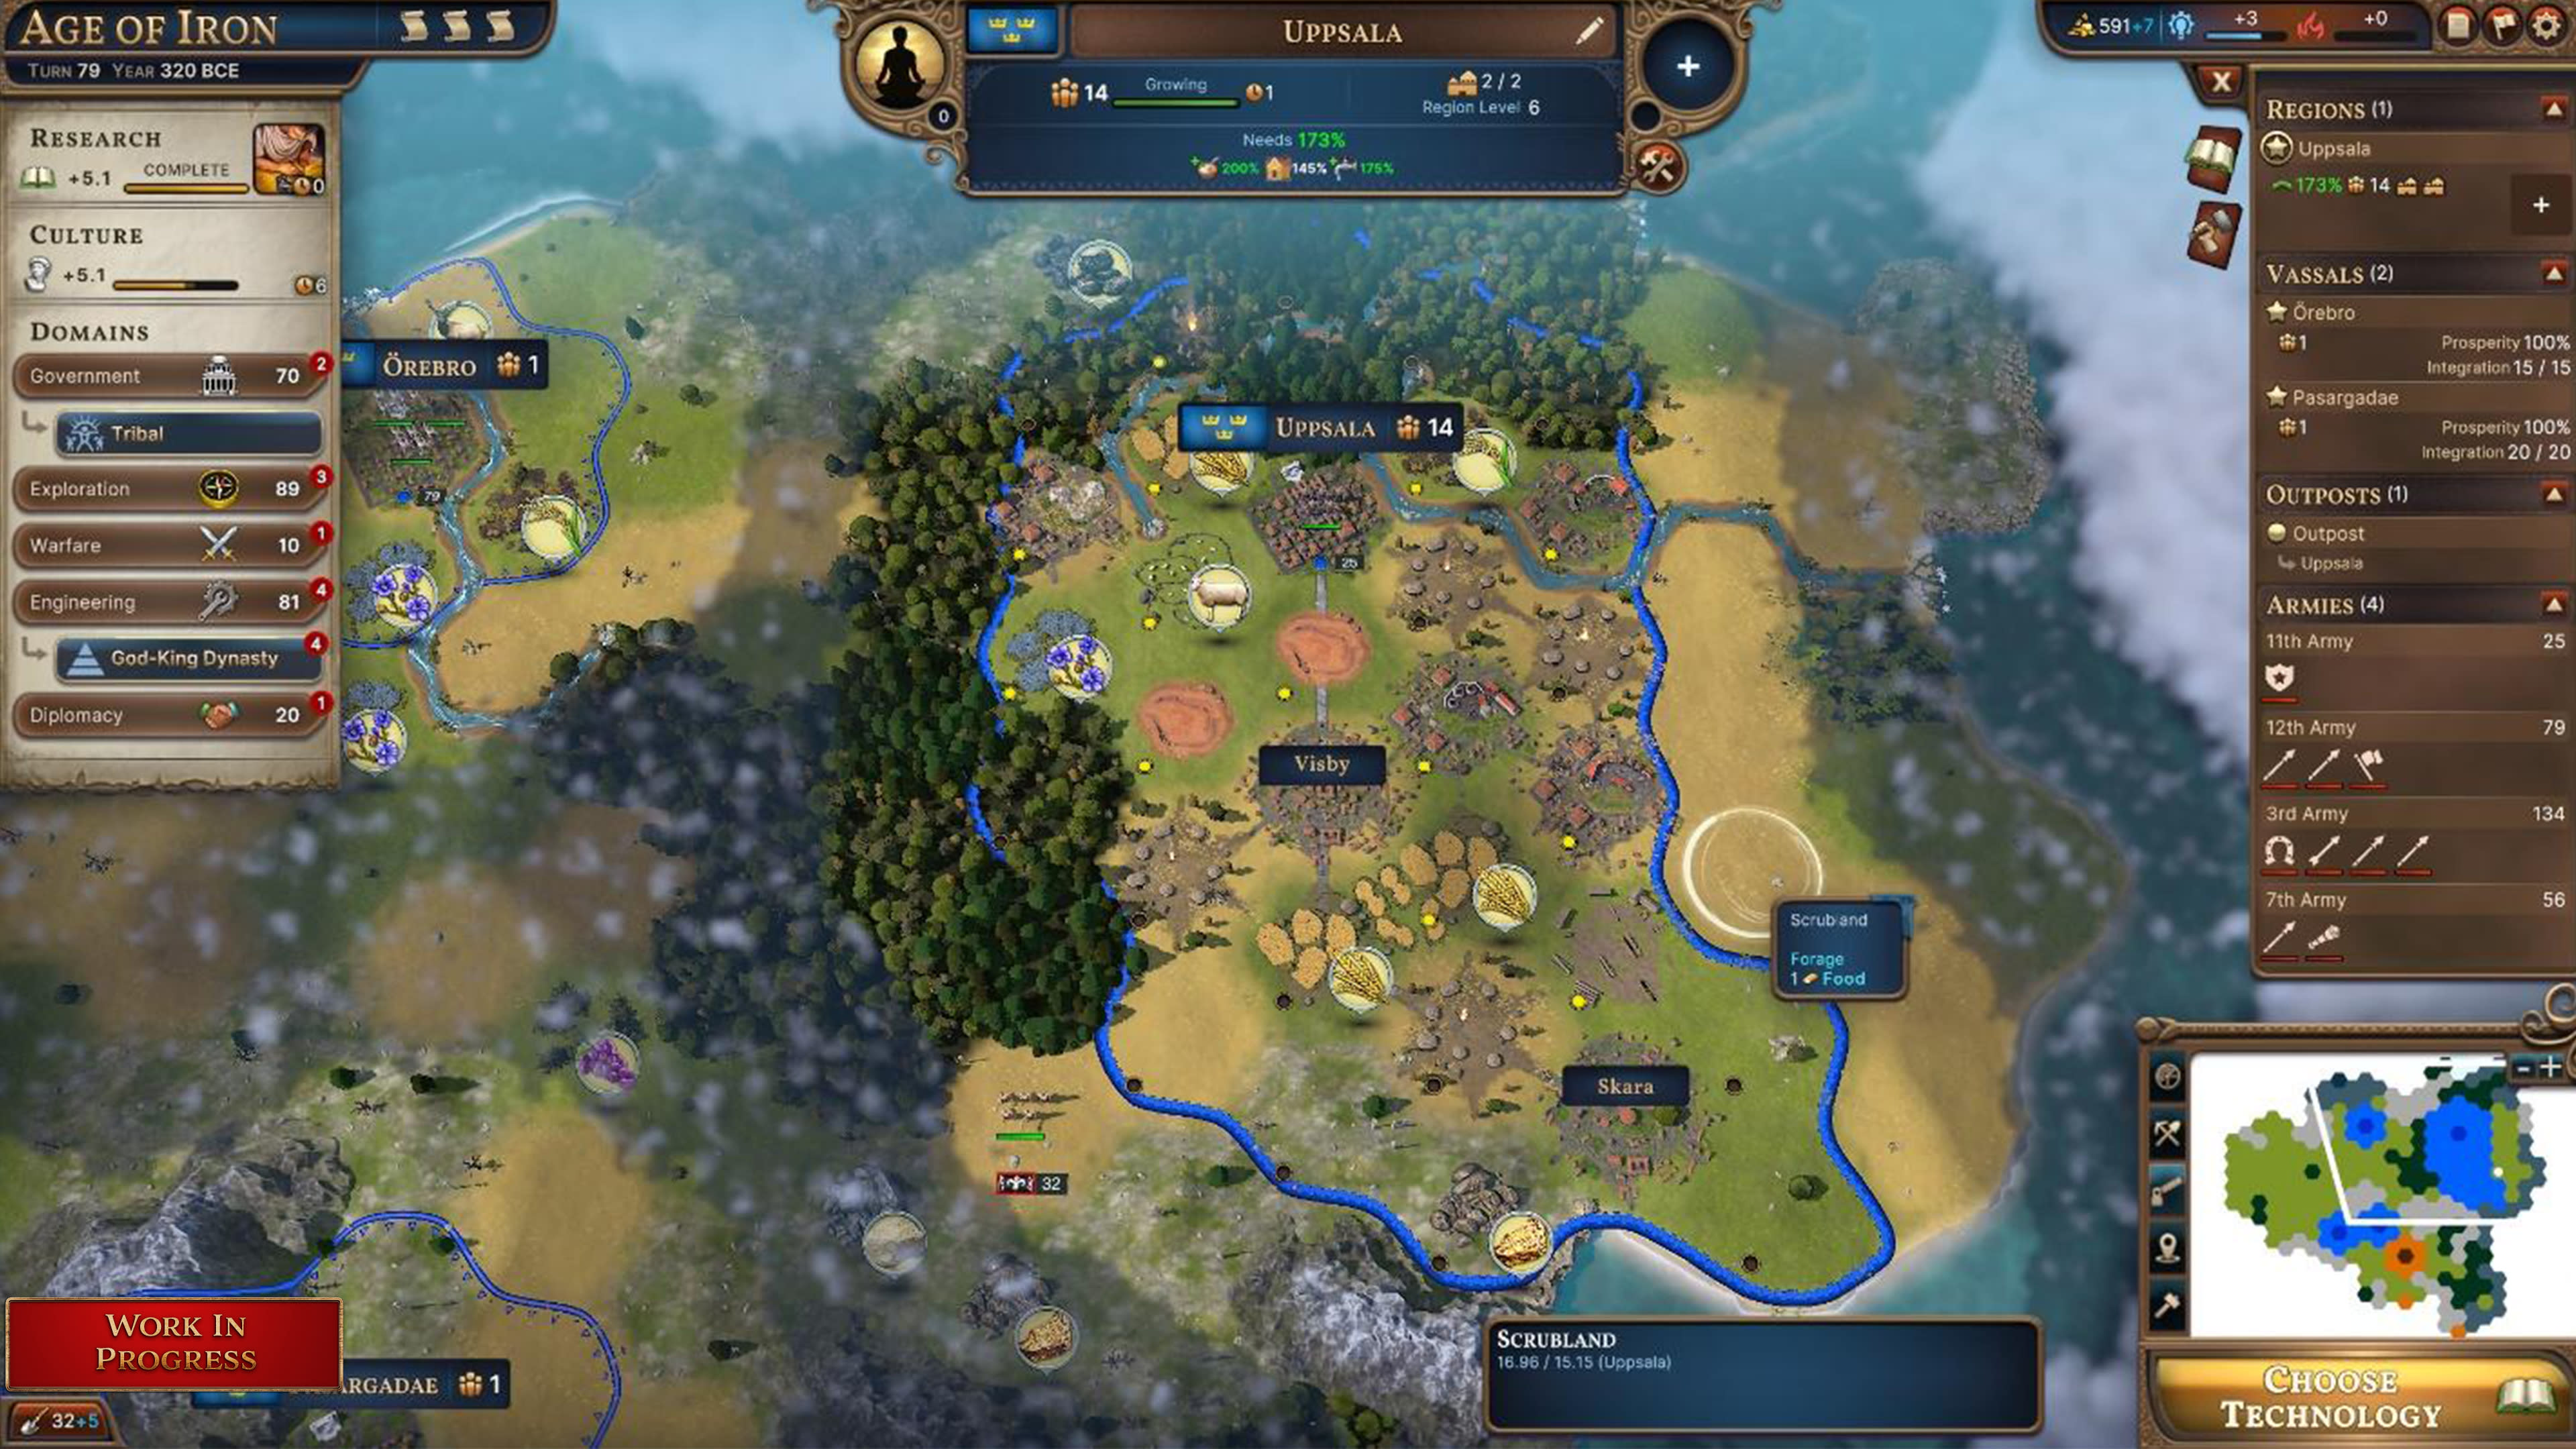
At the heart of the economy are your Regions, which house your Population. Your Population lets you work the tiles controlled by the Region, generating Resources directly, or Goods that convert back into Resources at the end of the turn. There are many paths to a bountiful economy – more Population to let you work more tiles, more advanced Goods which convert into more valuable resources, or just expanding to control more Regions in the first place.
How you assign your workers gives you a lot of flexibility about what you’re actually generating each turn. When there’s a war going on, sometimes extra Production to finish out a new Unit is a lot more important than growing your Population. You can manually control each worker’s assignment, but if you prefer to just focus on the big picture, the game will make sure that no workers are left idle at the end of a turn.
Some parts of your economy generate passive income as well. For example, you can construct a Town Center for +1 Government XP per turn. There are many Technologies and Ideals which also give you income directly, or for each Region you control. When creating a “wide” Nation these per-Region bonuses are important as they can scale up dramatically.
Let’s get into some details!
National Resources
These are all tracked & accumulated at the “nation level”, pooling income from all your Regions together. They generally carry over from turn to turn.

Knowledge – Used to develop Technologies, which give you new bonuses and unlocks as well as let you progress through the Ages. In a game about moving through thousands of years of progress, this is always an important Resource to focus on!

Culture – Each time the Culture meter is filled up, you use one “Culture Power”, which provides a wide range of potent effects from instantly mustering armies, expanding your Regions, or change your Government. Each time you use a Culture Power, the cost for the next one increases slightly. Managing your Culture when you have a lot of Regions can be quite challenging, but many of the Culture Powers provide abilities you cannot access in any other way.

Wealth – If you want to maintain a large standing army, you’ll need plenty of Wealth to pay for Upkeep on your Units. Some elite Units require a great deal of Wealth to maintain, while others are much more affordable. As you progress in the game you’ll unlock the ability to use Wealth to “rush” progress in Regions, or towards your next Culture power.

Improvement Points – These do pretty much right what it says on the tin, you use them to build new Improvements! Improvements let you get much more out of your workers, and are the primary way you get and convert Goods. Later in the game you’ll also encounter Specialists, which function similarly but represent the requirements of a more educated workforce as opposed to pure infrastructure (and in the Age of Alchemy you might find yourself in need of something rather more exotic…)

Domain XP – Each of the six Domains in the game (Exploration, Warfare, Engineering, Diplomacy, and Arts) has its own Resource, representing your Nation’s expertise and preparation in that Domain. They are used to both to use Domain Powers (like spawning Settlers, Artists and other unique units) as well as to purchase new Ideals from your National Spirits (which can provide extremely powerful specialized bonuses).
Regional Resources
These are generated by, and used with, a specific Region. They generally do not carry over from turn to turn but instead are used immediately.

Production – Each Region can build one thing at a time, usually a Unit or Building. Each turn your Production is applied to the current build, in a process that should be quite familiar to most 4X players. Regions can also work on “Projects” which let you convert your Production over to other Resources instead of building a new thing.

Influence – By generating Influence, a Region can control more territory on the world map. There are many factors that control which specific tiles are acquired such as Town placement, geography, and Technology adjustments, but they all start with Influence. Well developed, high Population Regions require a lot of space for all their Improvements so this is an important, if subtle, Resource to manage.

Needs – There are a wide variety of Resources that Regions use to keep their Populations satisfied. Early on this is met by Food and Housing, but by the end of the game large regions can require Education, Ideology, and more. Meeting the Needs of a Region grows your Population, which in turn can cause them to have more types of Needs.
Needs
Needs are worth describing a bit more in detail, because they are such a key concept in the game. There are 9 types of Needs in total, and how well your population grows is directly determined by your overall “Needs Satisfaction” (which is simply the average of all the individual Needs). If you meet the need at 100%, your people will have their basic requirements met – slow and steady growth. But if you can provide up to 200% Satisfaction, you can grow a Region much, much faster. Of course, the converse is true as well, as a Region with less than 100% Satisfaction will not only cause your Population to decrease but also has other negative consequences for a Region!
Five of the Needs (Food, Housing, Sanitation, Luxury, and Education) are triggered simply by hitting various Population thresholds in the Region (for example, Sanitation becomes required once you are above 10 Population). The other four (Faith, Power, Ideology, and Information) are more conditional, activating based on external factors like Religion or Government.
Almost all Needs grow directly with your Population, so managing a full set of Needs on a very large Region can be quite challenging! Vassals have a key advantage in that you don’t need to manage their Needs at all – the autonomy provided to a Vassal lets them grow at a steady pace without any guidance.
Goods
While Resources are directly gathered via Forage (on unimproved tiles) and Buildings / passive bonuses, any advanced economy is going to run mainly on Goods. Goods represent a wide variety of things from raw materials to advanced consumer products – there are around 130 different Goods! Each type of Goods has a different “consume value”, which is what you get at the end of the turn if you don’t use it for anything else. Many Goods even give you multiple types of Resources when consumed!
Goods come from a variety of sources, but the most common way to get them is to work Improvements. For example, direct Forage from a Grassland tile gives 2 Food, but if you build a Farm you can instead get one Wheat, worth 4 Food. Finding “bonus” tiles in the world can take that even further – building a Farm on Wheat bonus gives you 2 Wheat from that same Farm, for a total of 8 Food.
To really get the most value out of your Goods, however, you will want to convert them into more advanced types of Goods. The aforementioned Wheat (4 Food) can be turned into Flour (8 Food) at the Mill – and each Mill provides capacity for converting up to two units of Wheat. Pursuing advanced Goods chains can be extremely efficient but they require an investment to build the right Improvements as well as have enough workers available to operate every step in the chain.
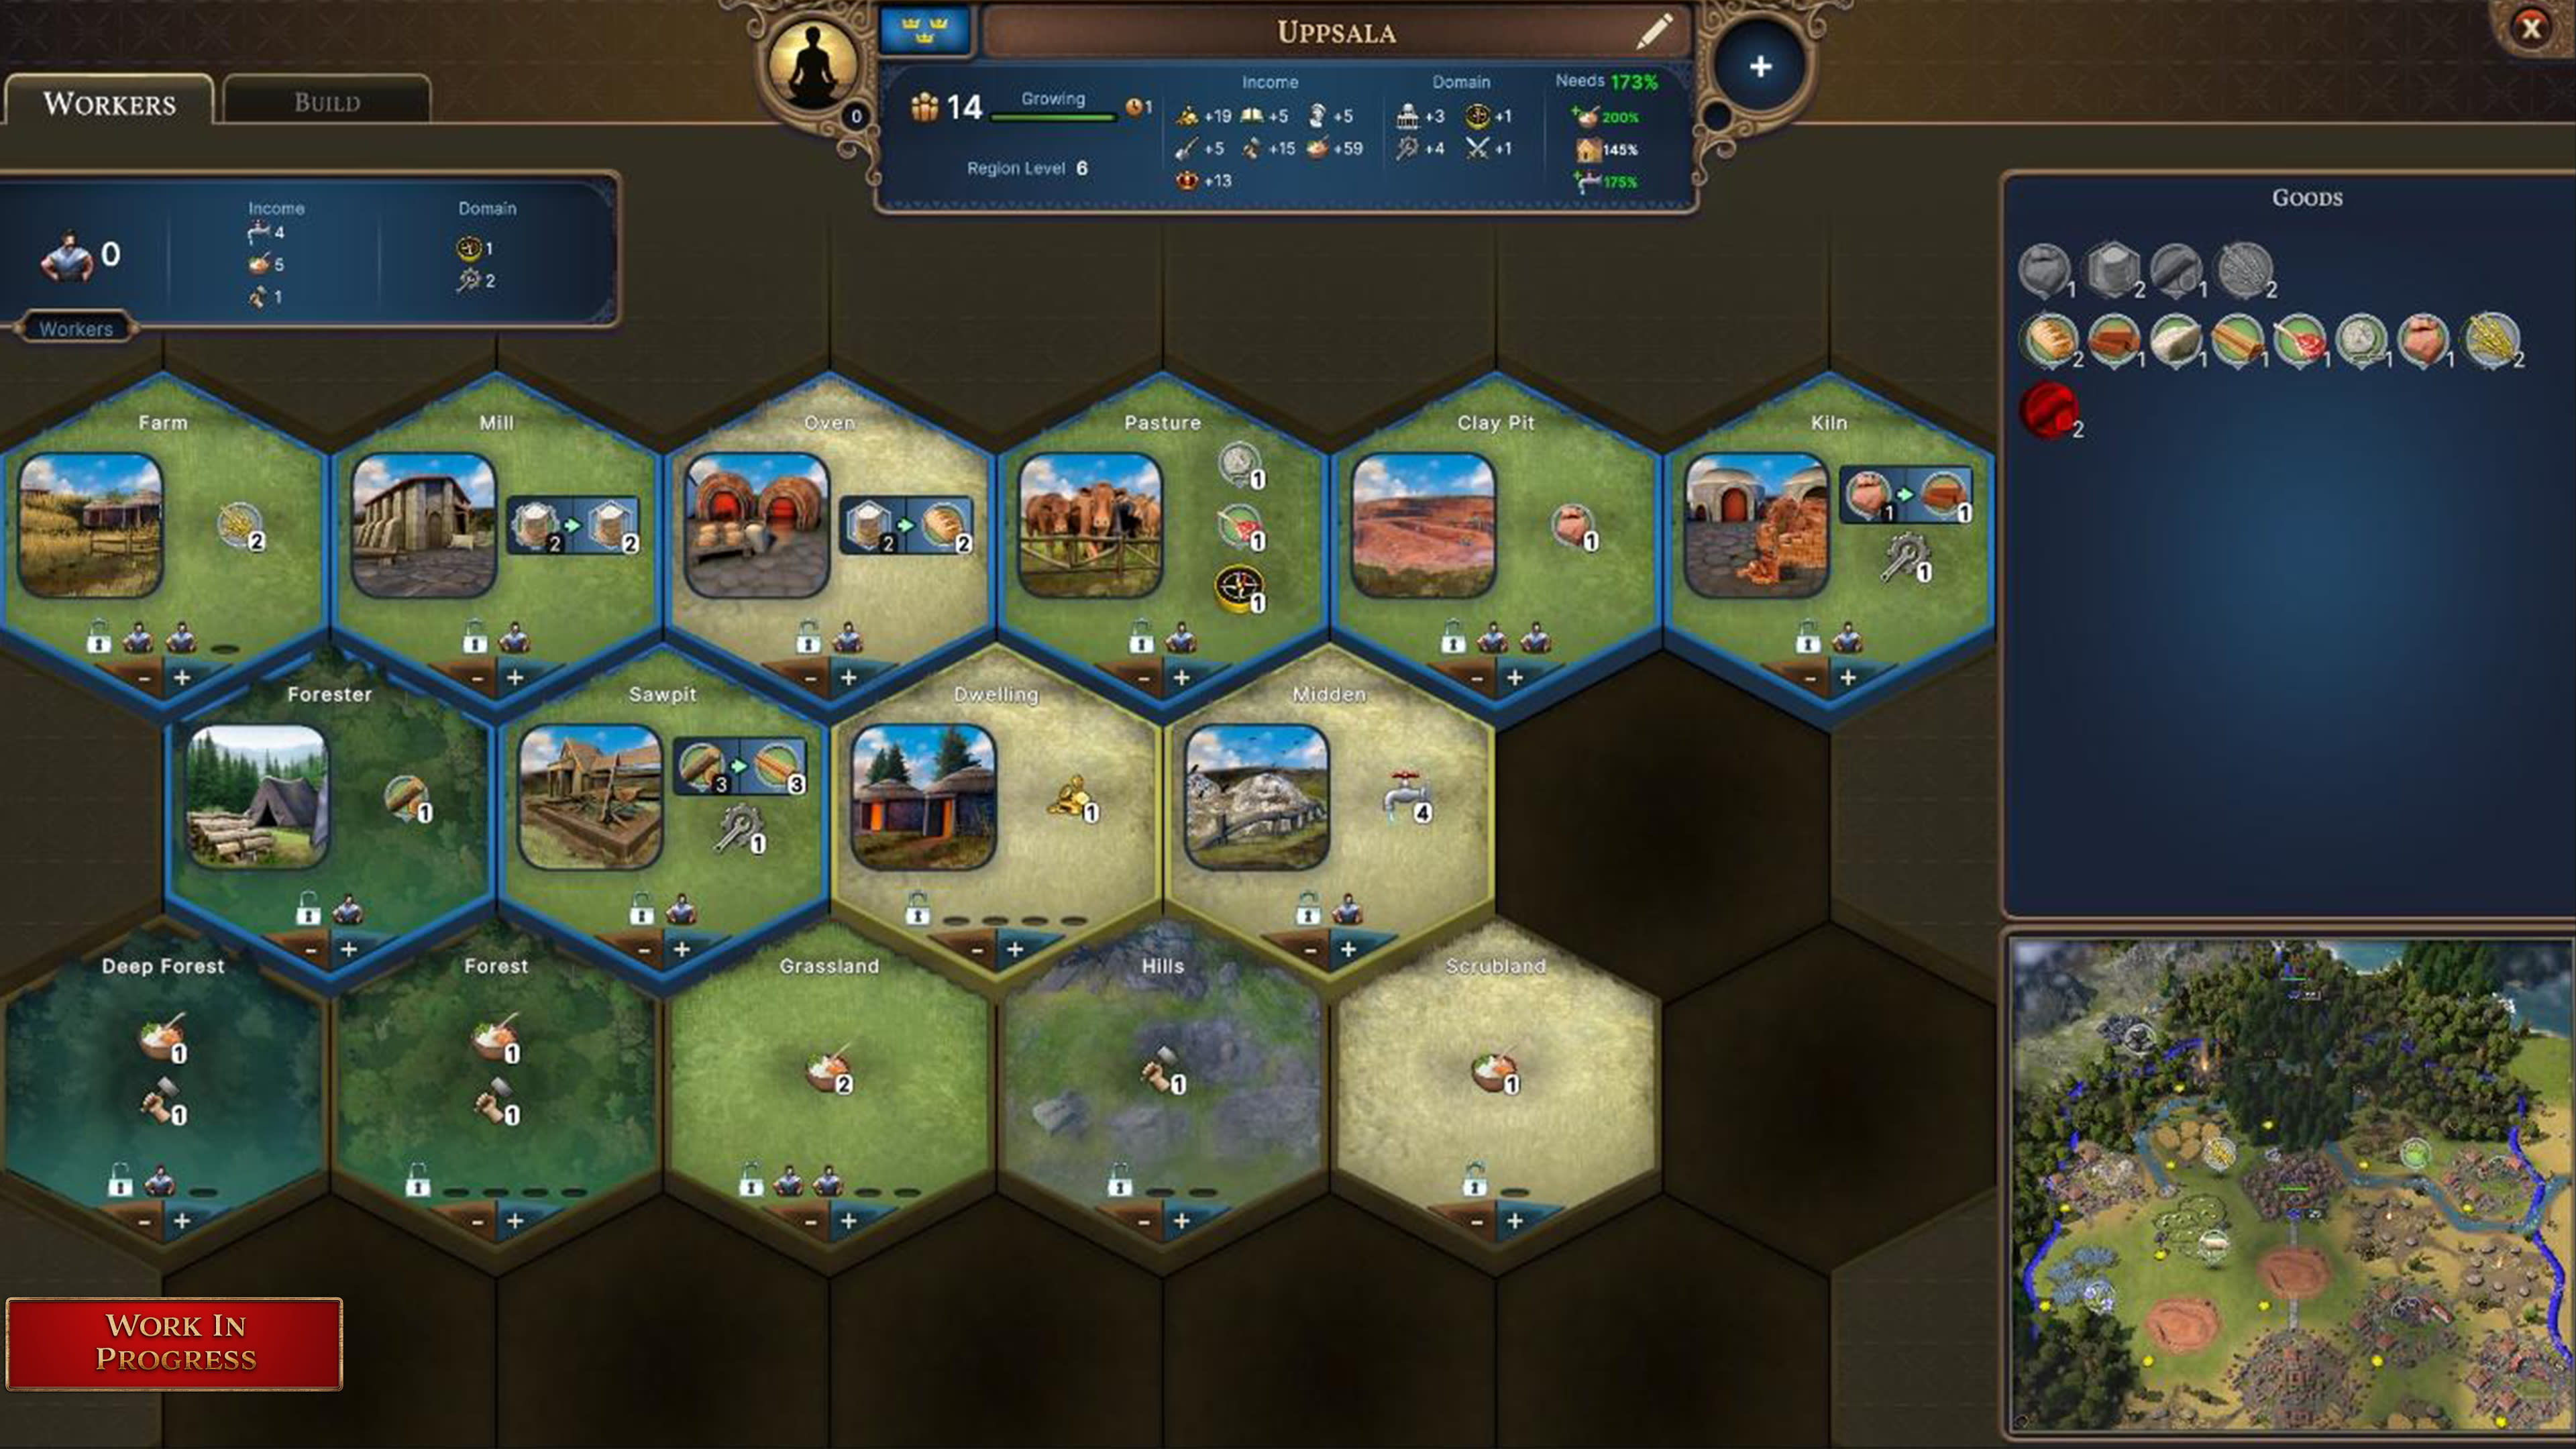
Which chains of Goods you decide the invest in makes a huge difference in how your strategy in Millenia will play out. National Spirits can modify the values of some Goods, and some chains are much more efficient if you have the right bonus tiles available. You can also use Goods to make both foreign and domestic trades, but we’ll get into that more in a future Design Diary.
Workers
You may have noticed that this overview of the economy refers to both Population, and “workers”, somewhat interchangeably. Early in the game, these concepts are the same – each Population provides exactly one worker, so a Region with Population 3 can work exactly three improved tiles. However, as you get deeper in the game, a few things change up that dynamic.
Around the middle of the game, depending on which specific Ages are chosen in a given game, higher levels of industrialization become possible. This is reflected in a few different ways in the game (efficiency, costs, Power requirements) but one unique thing about industrialized improvements is that they allow multiple workers to be assigned to the same Improvement! For dense, highly developed Regions this makes a significant difference in how you build up your economy. To take maximum advantage of these Goods chains you may have to retool your infrastructure significantly.
In the later Ages, economies of scale are represented by “bonus workers”. Regions with larger Populations start getting workers at better than 1:1, so for example at 20 Population you might get not just the 20 workers available from population but +2 bonus workers (1 for every 10 Population). Getting the right Technologies (and Ages) can push that even further, giving a nice bonus to late game mega-Regions.
----
From a design perspective, it’s been a fun and exciting challenge to make an economic system which fits the scope of a 4X that covers all of history. Managing your economy starts out pretty simple in the Stone Age but by the end of the game there are a lot of moving pieces.
As mentioned at the start, this is just “part 1” of our look at the economy in Millennia. There’s lots to cover with trade, merchants, outposts, town specializations, and more. Until then, we’ll see you again next time to discuss some more specifics about how Ages work.


